Why the Veichi SV inverter does not see the Felicity battery
The link between a Veichi SV-series hybrid inverter and a Felicity lithium battery is the most common point of failure at system start-up. The inverter is on the wall, the battery is charged, every breaker is on — and yet there is zero communication on the screen: the inverter simply does not "see" the BMS. Without this data exchange the system has no idea of the real state of charge, cannot correctly limit charge and discharge current, and often either blocks the battery entirely or falls back to a voltage-only emergency mode.
Years of support practice show the same picture case after case: the problem is almost never a "faulty" inverter or battery. It comes down to three things — the physical link (cable and pinout), the battery type in the inverter menu, and the correct protocol identifier. We will go through each layer in turn, because that is exactly the order in which they should be checked.
Why does this data exchange matter so much? A lithium battery is not just a "box of energy". Inside it runs a management system (BMS) that watches the voltage of every cell, the temperature and the balance. When the inverter receives this data over the digital channel, it knows precisely how much it can take and give, and limits charge and discharge currents correctly. With no link, the inverter at best manages the battery "blind" — by overall voltage only — and at worst blocks it and switches to the grid. The outcome is the same: the system is installed, the money is spent, but the expected autonomy and savings are not there. That is why setting up the link is not a box-ticking detail but the condition without which the whole system runs at half power.
If you are still putting a kit together, the base hybrid inverter models and compatible lithium batteries are gathered in the hybrid inverters and batteries for solar panels sections. Practical notes specific to the Veichi range are kept in our article on Veichi hybrid systems.
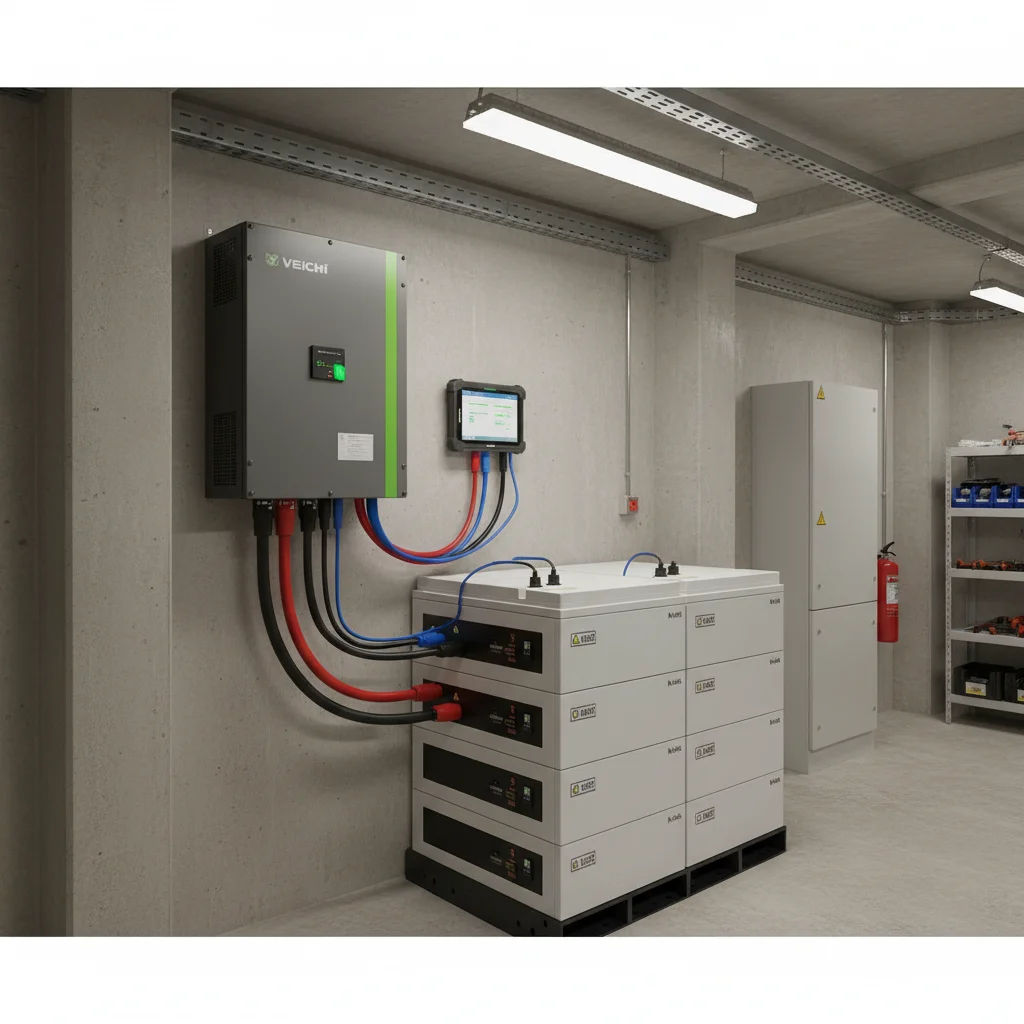
The physical layer: CAN pinout on RJ45
The first thing to understand: the connector on the inverter and the battery looks like an ordinary network RJ45, but it is not Ethernet. It carries a CAN bus (or RS485), and the purpose of each pin is set by the manufacturer, not by a network standard. This is exactly where the classic mistake happens.
The diagnosis from the field: customers grab an ordinary computer patch cord and assume that "if the plug fits, it will work". But the CAN pinout on Veichi often does not match the pinout on Felicity. The cable physically clicks into the socket, yet the CAN High / CAN Low lines never connect — hence the "silence" on the bus.
A separate nuance is the quality of the cable itself. There is a steady pattern in the field: an unshielded RJ45 patch cord can introduce interference and comms dropouts. Next to power cables and the inverter the noise level is high, and a cheap unshielded cord picks up that interference. For a data bus, use a shielded cable. This is the case where saving on a cheap cable turns into hours of pointless "why on earth won't it work" diagnostics.
It helps to remember how CAN differs from an ordinary network. Ethernet runs on pairs 1-2 and 3-6, and there the pinout is standardised — any patch cord will do. On a CAN bus, however, the pin assignment is set by the equipment manufacturer, and two different brands may well route the CAN High / CAN Low lines to different contacts. That is why "the same connector" guarantees nothing: a physically compatible plug does not mean a logically compatible pinout. Before joining the inverter and the battery, make sure the CAN lines on both ends meet on the same pins.
What actually needs checking at the physical level:
| What we check | Typical value / action | Note |
|---|---|---|
| CAN pins on the Felicity battery side | Usually 4 and 5 | On some models — 1 and 2. Check against the documentation of the specific battery. |
| Cable type | Shielded RJ45 | An unshielded patch cord causes comms dropouts. |
| Battery type in the inverter menu | LIB (Lithium) | Without it the inverter runs on "lead-acid" voltage logic. |
| Protocol ID for Felicity | Often 01 or 05 | Depends on the battery firmware; chosen from the two values. |
The logic of a simple check is this: first find out which pins of the battery connector physically carry CAN. Usually it is pins 4 and 5, but on some Felicity models it is 1 and 2. If your cable is wired for 4–5 while the battery expects the signal on 1–2, no menu setting will help — the inverter physically receives no data.
Inverter setup: battery type and Protocol ID
Once the physical layer is sound, we move into the inverter menu. There are two critical items here.
1. Battery type — LIB (Lithium). Hybrid inverters can work with both lead-acid and lithium batteries. If the settings are left on the "lead-acid" type, the inverter does not expect any digital exchange with the BMS at all and manages the battery by voltage levels only. For the link with Felicity the battery type must be set to LIB (Lithium).
2. Protocol ID. Even a correctly connected lithium battery "speaks" its own dialect of the protocol. For Felicity, the values that work in practice are 01 or 05 — which one depends on the battery firmware. If one does not bring up the link, try the other. This is not random guessing but a choice between two known working options.
After the LIB type and a correct Protocol ID are set, the inverter should start receiving real data from the BMS: state of charge, voltage, current and protection flags. From this point the battery is managed "intelligently", not merely by voltage thresholds.
How do you know the link is up? The simplest sign is that the inverter begins to show a correct state of charge in percent (SOC) and to react to it: it stops charging near full capacity and does not try to discharge the battery below the allowed level. While there is no link, the inverter either shows no battery state at all or shows only "bare" voltage without a charge percentage. This is a good reference point during commissioning: as soon as a live SOC and BMS flags appear, communication is working and you can move on to checking the operating modes.
One more practical point about charge current. Even with the link configured, it is worth checking the maximum charge current set: for lithium it should not be raised above 0.5C, so as not to shorten cell life. The BMS does have its own protection, of course, but a correctly set limit on the inverter side is an extra margin of reliability that extends the battery's life.
General questions on inverter setup and control are gathered separately — see the inverter FAQ. And if you want to dig deeper into how a lithium battery management system is built in the first place, the article on the BMS for LiFePO4 is useful.
Step-by-step BMS comms diagnostics
To avoid shooting in the dark, stick to the sequence — it saves the most time:
- Cable. Make sure it is a shielded RJ45, not the first patch cord to hand. Inspect the connectors — are all the conductors crimped or not.
- Pinout. From the battery documentation, find which pins carry CAN: 4–5 or 1–2. Compare with how your cable and the inverter input are wired.
- Battery type. In the inverter menu, set LIB (Lithium).
- Protocol ID. Set 01. If the link does not come up — change it to 05.
- Restart. After changing the battery type and protocol, restart the system correctly — more on the right power-on order below.
In 9 cases out of 10 the link "comes alive" already at the pinout or Protocol ID step. If after all the steps the inverter still does not see the BMS, that is a reason to check the specific cable and the documentation for your exact battery revision — not to swap the hardware.
An important detail for those used to the "change one thing and see" method: change parameters one at a time, not in a batch. If you swap the cable pinout, the battery type and the Protocol ID all at once, then even when the link appears you will not know what actually brought it up — and on the next install you will repeat the whole diagnostic from scratch. One step, one check. That way you not only solve the problem faster but also remember the working combination for your specific "inverter + battery" pair.
Safe power-on: battery first, then panels
Setting up the link is half the job. The other half is not damaging the inverter at the moment of first start-up. There is a field case the support team calls the "bang": a customer's capacitors blew when switching from grid to battery.
The mechanics are simple. When the relay switches over — especially in winter, when the house has a lot of reactive load (fridges, pumps) — there is an inrush of current. If the DC bus had not been pre-charged, or there is a phase imbalance, the inverter's capacitors cannot withstand that inrush.
The golden rule of power-on:
- First turn on the battery (DC breaker).
- Wait for inverter initialisation — 5–10 seconds.
- Only then turn on the solar panels and the grid (AC).
And a separate warning: never energise the panels into a "bare" inverter with no battery, unless the model explicitly supports it (Battery-less mode). A detailed breakdown of why this order matters and what happens on the DC bus is in the article on the power-on order of a hybrid system.
Operating modes SUB / SBU / USB and savings
The second most frequent question after BMS comms is "which mode should I pick to actually save money". Hybrid inverters have three basic power priorities, and they give a fundamentally different result on the electricity bill.
- SUB (Solar-Utility-Battery) — "reliable winter". The home runs on solar; whatever is missing is topped up from the grid. The battery is always kept at 100% as a reserve in case of a blackout.
- SBU (Solar-Battery-Utility) — "maximum savings". First we take solar, then we discharge the battery, and only as a last resort the grid. This mode is recommended for summer.
- USB (Utility-Solar-Battery) — grid priority. Used rarely, only where solar is just an auxiliary source.
In short: in winter it makes more sense to keep SUB so the battery is always full for a blackout; in summer, switch to SBU to draw the maximum from your own generation and the battery. A full comparison with examples is in the article on the SUB / SBU / USB modes.
Typical failures: display, varistor, MPPT
A few faults are so common that they are worth knowing in advance.
Display defect (SV-4K). If the letters on the display look like "hieroglyphs" or segments are missing, this is not a setup error but a display ribbon-cable defect. The only cure is a warranty replacement.
"Death" after a blackout. If the inverter does not switch on at all after the power returns, most likely the input varistor or fuse has blown due to a mains overvoltage (so-called Dirty Power). This is a consequence of mains quality, not an inverter defect.
MPPT will not start. The solar tracker has a working voltage window. If too few panels are assembled and the array voltage is below the lower edge of the window (for example, 120 V against a working window of 60–450 V), the MPPT tracker simply will not start — the inverter does not "see" the sun. The fix here is not in the inverter but in the correct string configuration.
And one more field rule about charging: for lithium, do not set the charge current above 0.5C, so as not to shorten cell life.
It is also worth remembering: a short circuit or a wiring mistake on the output side is the responsibility of whoever assembled the system. There are field cases where a warranty was refused, quite justifiably, because of a customer error. So neat wiring and a correct start-up order are not a formality but direct savings on repairs.
Pulling it all together, a reliable start of a Veichi SV hybrid system with a Felicity battery comes down to a few simple but mandatory steps: a shielded cable with a correctly wired CAN pinout, the LIB battery type in the menu, the correct Protocol ID (01 or 05), and only then the right order of applying power. None of these points can be skipped: a link without a correct start-up gives the "bang", and a correct start-up without a link gives a battery the inverter manages blind. Only the full set works.
And a final tip from practice: save the working settings for yourself right after a successful start-up — the battery model, which pins carry CAN, which Protocol ID fit. Next time you need to expand the system or reinstall the inverter, that note will save you a whole evening of diagnostics.
Frequently asked questions
Why does the Veichi SV inverter not see the Felicity battery?
Most often for one of three reasons: a CAN-pinout mismatch on RJ45 (the battery expects the signal on pins 4–5 or 1–2 while the cable is wired differently), the LIB battery type not set in the inverter menu, or a wrong Protocol ID. Check in exactly that order.
Which RJ45 pins carry the CAN line on Felicity?
Usually pins 4 and 5, but on some models 1 and 2. The exact assignment must be taken from the documentation of the specific battery.
Which Protocol ID should I set for Felicity?
In practice the working values are 01 or 05, depending on the battery firmware. If one does not bring up the link, try the other.
Can I connect the inverter with an ordinary patch cord?
Better not. The connector looks like a network RJ45, but it is a CAN bus, not Ethernet, and the pinout is set by the manufacturer. An unshielded patch cord also causes comms dropouts from power-cable interference. Use a shielded cable and always verify which pins carry the CAN line on both ends.
Can I turn the panels on first, without the battery?
No, unless the model supports Battery-less mode. First the battery (DC) comes on, then 5–10 seconds for initialisation, and only then the panels and grid (AC). Otherwise the capacitors may be damaged.
What charge current should I set for a lithium battery?
No higher than 0.5C, so as not to shorten cell life. The BMS has its own protection, but a limit on the inverter side is an extra margin of reliability.
How do I know the BMS link is finally up?
The simplest sign is that the inverter begins to show a correct state of charge in percent (SOC) and to react to it: it stops charging near full capacity and does not discharge the battery below the allowed level. While there is no link, you see only "bare" voltage without a charge percentage.
What do the "hieroglyphs" on the SV-4K screen mean?
This is not a setup error but a display ribbon-cable defect. If the letters are garbled or segments are missing, the issue is resolved only by a warranty replacement.
The inverter will not switch on after the power returns — what is this?
Most likely a mains overvoltage (Dirty Power) blew the input varistor or fuse. This is a consequence of mains quality, not a defect of the inverter itself.